How to make a handmade Christmas Card- Jingle Bells

Why You should make Your Own Christmas CARD?
- Christmas Cards: DIY and Store Bought Cards- Which Is Better?
Every year before Christmas, I would spend some time making home made Christmas cards for my love ones and special friends. Store bought cards are useful for common friends. Handmade cards priceless
If you are looking for a store bought Christmas Card, STOP RIGHT THERE!
Don't waste your money on these plain printed cards.
You should try making your own handmade Christmas Cards in bulks or single for a unique creation.
This year, I am making this Christmas Card, for my family members and friends. The theme is JINGLE BELLS, which I had used last year Christmas gift wrappers that I had received a present from my dad.
I had created a SIMPLE and COLORFUL design based on my previous Christmas Cards I had seen at my dad's place. A simple greeting card that give everyone a warm feeling of Christmas cheers and gifts to share.

Choose the right color for the ribbon
I like the touch of satin texture of this ribbon.
I prefer to choose solid simple color as my main border for the ribbon.
Fancy colors with small print are not suitable for a Christmas card unless you can find snow flakes ribbon.
Peach or cream is my favorite color that matches well with white or yellow cards.
Buy in bulk to save a lot of money. Peach color is easier to match with any greeting cards or birthday cards.
Furthermore, keep the excess satin ribbons for making handmade gifts or make bow ties for your gift box.
What is your favorite ribbon color?
Things you need to prepare

Basic Stationaries

Things you need to prepare:
White stock card - 1pc
Peach color ribbon - 1 string, you could use any glittering or pattern ribbon that you prefer
2 different color construction papers- I used pink and yellow paper to match the bell color
a pair of scissors
pencil and ruler
a bottle of white glue
double-sided tape
used Christmas wrapper - I chose a Jingle Bell and a Gift picture for the front card
Buy now at $8.98 ( save 28% of original price )

Step 1

Choose and cut
- Use old Christmas wrapper to cut out 2 pictures.
- Choose any pictures that are related to the Christmas theme but it would be nice to have BIG and colorful gifts , trees or Santa for the front page.
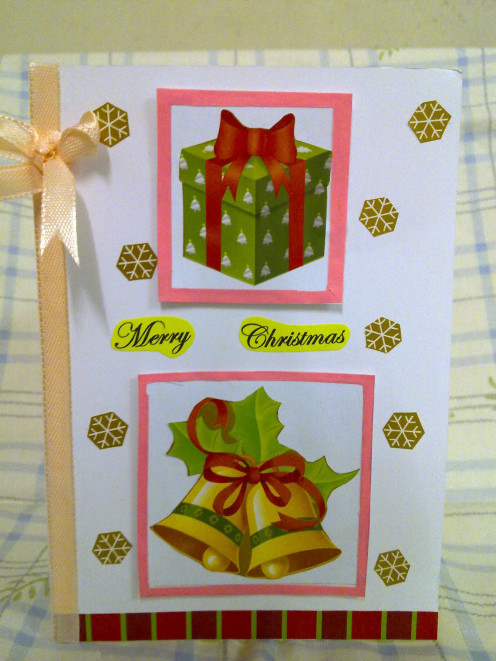
- I chose a pair of big Jingle bells and a gift box for my Christmas front card.
- Cut out the shape of the bell and gift box.
- Leave aside for later use.
Step 2

Cut and Paste
- Use a pink construction paper for the base of the pictures.
- Place the bell picture onto the pink paper.
- Draw a square box outline along the bell.
- Cut out the pink box.
- Apply glue at the back of the bell picture and paste it onto the pink box.

Follow the same procedure for the gift box picture as well.
Print out the Greeting Words

Step 3
You can either write by hand a cursive handwriting of the words "Merry Christmas" or print it out with a word processor.
Make sure the word "Merry" is on the first line and "Christmas" is on the second line.
Print the Christmas greetings onto a yellow construction paper.
Cut out the shape of the Christmas greeting and set aside.
There should be two separate words" Merry" one word and "Christmas" another word.
The bottom line

Step 4
For the bottom of the front card, I chose a red gift wrapper to make the bottom line.
You can choose any colors that is related to the Christmas theme, for example red, white or green gift wrapper.
Use the same gift wrapper so that you don't have to spend money on purchasing another gift wrapper.
Making the stubs

Step 5
Use the spare white stock card to make four stubs.
These stubs are used to make a 3D image for the bells and gift box.
Cut the white card into two small squares.
Fold left flap inward and the right side inward as photo shows.
Repeat the same for the rest of the 3 stubs.
Paste the stubs

Paste 2 rectangle stubs behind the bell picture.
Repeat the same procedure for the gift picture too.
All 4 stubs are being used up.
Border with the ribbons

Step 6
Measure the length of the ribbon as according to the left hand side of the front card.
Cut another piece of ribbon and tie it into a bow.
Cut off the excess tails.
Use a double sided tape or white glue to paste the bow onto the ribbon, at the top .
Arrange and paste the pictures

Apply generous white glue at the back of the bell picture.
Apply on the four sides.
Paste the bell picture on the middle top of the front card
Leave a little space for the Christmas greetings in the middle of the front card.
Apply some white glue behind the gift picture.
Paste it on the middle, bottom of the front card. ( as picture shown )
How do you send your Christmas Cards?
Paste the Christmas greetings

Step 7
See the "Merry Christmas" words that I had cut out?
Apply some glue at the back of the greetings.
Paste the "Merry" and "Christmas" in the middle of the front card.
Make sure the greetings are paste in the centre of the card.
Let's paste the snow flakes!

Cut out some snow flakes approximately ten of them in any shape you desire.
I had cut out the shape of an octagon since the snow flake does shape like that.
Paste the snow flakes around the front card.
Make the snow flakes look as if they are falling softly around the gift and bells.
Step8

Fold half the A4 size of the yellow construction paper.
Fold it into half.
Make sure the yellow paper is slightly smaller than the Christmas card.
Apply a little glue behind the folded yellow paper and paste it inside the Christmas card.
Write your Christmas Quotes With These:
- Funny,Inspirational,Famous,Best Christmas Quotes and Charlie Brown Christmas Quotes
Need a Christmas quote? Try these funny, inspirational, famous, best Christmas quotes and the famous Charlie Brown Quotes for your Christmas cards. Charming and funny.
A completed Jingle Bell Christmas Card

© 2011 peachy